

Introduction to Your bellicon Rebounder Assembly
Bellicon Rebounder Assembly Instructions. Welcome to the first step in your journey towards a fun and effective exercise routine with the bellicon rebounder! Embarking on the assembly of your new bellicon rebounder can feel like a daunting task, but we’re here to ensure that this process is as smooth and straightforward as possible. In this guide, we offer detailed instructions and helpful tips to get your bellicon set up and ready for action in no time. Whether you’re a seasoned assembler or a novice, our aim is to make this initial phase of your bellicon experience enjoyable and hassle-free.
Before you begin, it’s important to select the perfect spot for your bellicon rebounder. Look for a space that provides ample room to jump safely, ideally with a high ceiling and a clear perimeter to avoid any potential obstructions. Also, consider the flooring – a flat and stable surface ensures optimal performance and safety during your workouts. Once you’ve found the ideal location, you can proceed with unboxing your bellicon. Inside, you’ll find all the components neatly packed: the robust frame, highly elastic bungee cords, a UV-resistant jumping mat, and sturdy screw-on legs, all designed to provide a seamless bouncing experience.
To facilitate a smoother assembly process, each part of your bellicon rebounder is meticulously crafted to fit together with precision. The intuitive design allows for hassle-free connections, often requiring a simple click or twist to secure. By meticulously attaching each bungee cord, you ensure the perfect tension that bellicon is renowned for – a tension that promises a low-impact bounce with an incredible workout potential.
What’s In Your bellicon Rebounder Box?
When the excitement of receiving your new bellicon® Rebounder mounts, you may wonder what goodies accompany the acclaimed mini-trampoline. Unboxing your bellicon® is an experience in itself, as each component is carefully crafted and packaged to start you off on your rebounding journey. Here’s what you’ll find once you open up your bellicon Rebounder box.
First and foremost, you’ll be greeted by the sleek, robust frame of your bellicon®. Strong yet surprisingly lightweight, the frame is designed to support and withstand the dynamic movements of rebounding. It serves as the cornerstone of all your future rebounding workouts. Alongside it, you’ll find the highly elastic, patented bungee cords – a defining feature of the bellicon experience. These cords are precision-engineered for longevity and performance, providing the soft, silent bounce bellicon® is known for.
Next in line is the high-quality, polypropylene jump mat. This mat is UV-resistant, ensuring it can maintain its integrity even if you decide to take your bellicon® for an outdoor session bathed in sunlight. Notably, the mat is affixed to the frame via the bungee cords, ensuring an even and forgiving distribution of tension that benefits all levels of fitness enthusiasts. This setup guarantees a workout that’s gentle on your joints while providing excellent cardiovascular and lymphatic benefits.
Add-ons and accessories may vary depending on the specific bellicon® model and package you’ve purchased but rest assured, every bellicon Rebounder box includes comprehensive assembly instructions to help you set up your rebounder with ease. Additionally, you’ll receive supportive customer service literature, ensuring that you have all the necessary tools and knowledge to embark on your rebounding adventure. While optional accessories might be present – such as support bars, frame cushions, or weight balls – your initial unboxing will certainly pave the way for a fun and energizing rebounding experience.
Setting Up the bellicon Rebounder Frame
Welcome to the exciting world of rebounding! As you embark on your journey to improve your health and fitness with a bellicon rebounder, the very first step is to set up your rebounder frame correctly. A properly assembled frame is crucial as it is the foundation of your rebounder and ensures safety and stability during your workouts. Let’s walk through the process of setting up your bellicon rebounder frame, so you can start bouncing your way to better health in no time.
Unboxing Your bellicon Rebounder: After unboxing your bellicon rebounder, you’ll find the components neatly packed and ready for assembly. Carefully lay out the parts on a clean, flat surface. The bellicon frame should include the circular main frame, legs, and rubber caps. Inspect each piece to ensure there’s no damage from shipping, and familiarize yourself with each component before beginning.
Attaching the Legs: The bellicon uses a unique screw-in leg system that provides stability and ease of assembly. Start by gently turning each leg into the threaded sockets found on the underside of the frame. It’s crucial not to force the legs in, as cross-threading can damage the frame and compromise the rebounder’s integrity. Instead, twist each leg clockwise until it is snug and fully secured. Once all the legs are attached, it’s time to add the rubber caps. These caps not only protect your floors but also add additional grip and stability to the rebounder.
Checking for Stability
With the legs attached, carefully place your bellicon rebounder upright in your desired location. Apply gentle pressure to each leg to ensure that all legs are evenly screwed in and the frame sits level on the floor. A wobbly frame might indicate that a leg isn’t screwed in all the way or that your floor isn’t completely level. Adjust as necessary to make sure your rebounder is stable. Remember, taking the time to set up your bellicon frame correctly is a small investment in guaranteeing you have the safest and most effective workout experience.

Attaching the Mat to Your bellicon Rebounder Frame
Attaching the mat to your bellicon® rebounder frame is a step that requires attention to detail to ensure a secure and safe bouncing experience. Before you begin, ensure that your bellicon® rebounder is positioned in a clear, flat area to allow for ease of assembly. Lay out your mat near the frame, and inspect the mat and bungee cords for any potential wear or damage to prevent any accidents during use.
Aligning the Mat Correctly is crucial for even tension throughout your workout. Start by aligning the bellicon® logo on the mat with the frame’s logo to keep the orientation consistent. This simple step will help you correctly distribute the bungee cords in the ensuing steps. It’s important to note that an unevenly attached mat can lead to improper rebounding mechanics and reduce the longevity of your bellicon® rebounder.
Next, begin to Attach the Bungee Cords from the mat to the frame, starting with the cords at each quarter point of the frame for even tension. Secure each cord by hooking it to the frame’s designated slots. You will notice that there may be some resistance due to the elastic nature of the bungee cords; this is normal and essential for providing the unique bounce the bellicon® is known for. Proceed to work your way around the frame, attaching the bungee cords in a crisscross pattern to maintain even and balanced tension.
Once all the bungee cords are in place, perform a Thorough Inspection of the rebounder mat’s attachment to the frame. Ensure that each cord is securely hooked and that the mat is centered and taut. This critical check ensures your safety and maximizes the lifespan of your bellicon® rebounder. If you encounter any slack or misalignment, adjust the cords accordingly. Proper attachment of the mat to the bellicon® rebounder frame will guarantee that you have enjoyable, low-impact workouts that the bellicon® is known for.

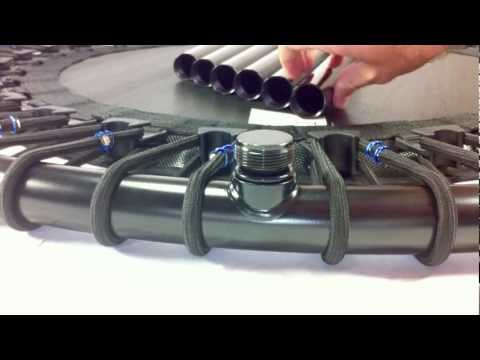
Securing the Bungee Cords: bellicon Assembly Tips
When assembling your bellicon trampoline, one of the most critical steps is ensuring that the bungee cords are correctly and securely fastened. Not only do these cords contribute to the trampoline’s overall bounce quality, but they also play a significant role in the safety of the equipment. Below, we’ll go over some essential tips to keep in mind when securing the bungee cords to your bellicon trampoline.
Check the Bungee Cords for Consistency
Before you begin the assembly, it’s vital to inspect each bungee cord for any signs of damage or irregularities. Lay the cords out and verify uniformity in elasticity and length. This step ensures that when you secure them, the tension is evenly distributed across the trampoline, allowing for a balanced bounce and reducing the risk of cords snapping during use.
Ensure Correct Cord Placement
As you hook the cords onto the frame, it’s important to ensure each one is properly placed. Double-check that the bungee hooks are fully seated in the frame slots. They should not be twisted or caught on any other parts of the trampoline. Securing them tightly and accurately not only maximizes the lifespan of your bellicon but also enhances the safety and performance of the trampoline.
Properly installed bungee cords can make the difference between a good and a great rebounding experience. Adhering to these assembly tips will help maintain the structural effectiveness of your bellicon trampoline and provide you with many hours of safe, enjoyable exercise. Remember, if you encounter any difficulties or have doubts during the assembly process, bellicon’s customer service is available to guide you to a properly secured setup.
Attaching the Legs to the bellicon Rebounder
When setting up your bellicon Rebounder for the first time, or after having stored it away, one of the most crucial steps is attaching the legs correctly. This isn’t just a matter of convenience; it’s essential for ensuring your safety and the effectiveness of your workouts. Let’s walk through how to properly secure the legs to your rebounder, ensuring stability and bounce quality.
Step-by-Step Guide
Begin by laying out the bellicon Rebounder frame flat on the ground, with the mat side facing down. It’s best to perform this on a non-abrasive surface to prevent any damage to the mat. The bellicon legs have a sophisticated screw-in system that is designed for quick and easy attachment. Align the leg with the threaded receptor on the frame and rotate clockwise. You should feel resistance as the leg begins to tighten; this is completely normal. Continue to twist until the leg is fully secured and stops naturally—there should be no wobble or give when you apply pressure. It is important not to over-tighten as this could strip the threads, undermining the structural integrity.
Ensuring Even Leg Length
It can be easy to overlook, but it’s crucial that each leg is screwed in to the same depth. Uneven legs can lead to an asymmetrical bounce and put undue stress on the rebounder’s frame and mat, which could compromise the unit over time. A useful tip is to count the rotations as you screw in each leg and ensure that they all match. Usually, a precise number of turns from the point of contact will guarantee equal leg length and optimal rebounder performance.
Checking Stability Before Use
Once all the legs are attached, carefully flip the bellicon Rebounder onto its legs to stand upright. Press down on the frame with your hand to check for stability; the frame should not tilt or shift. If you notice any movement, it’s likely one of the legs isn’t screwed in properly. Go back and double-check each leg; they should all be flush against the frame. This process not only ensures your safety but also helps to maintain the rebounder’s longevity by preventing unnecessary strain on any one leg or connection point over time.
Bellicon Rebounder Assembly Instructions: Safety Checks Before Your First Bounce
Trampoline safety is of paramount importance, particularly when using one for the first time or if it’s been a while since your last bounce. Before you begin reveling in the excitement of jumping, a comprehensive set of safety checks should be performed to reduce the risk of injury. Ensuring that the structural integrity of the trampoline is intact will provide peace of mind and let you focus on the joy of bouncing.
First and foremost, inspect the trampoline mat and springs. Look for any signs of wear, such as fraying or holes in the mat and rust or damage on the springs. The jumping mat should be securely attached to the frame with all springs evenly tensioned and firmly in place. Any damaged springs should be replaced immediately, as they could significantly compromise the trampoline’s safety. Additionally, verify that the frame has no bends, dents, or broken parts.
An often overlooked but crucial aspect of trampoline safety is the placement of the trampoline itself. Make sure it’s set on a level and clear area, away from trees, fences, or any garden furniture that could pose a risk when using the trampoline. It should be positioned in an open space, ideally with safety netting installed around the perimeter to prevent falls from height. If you have a spring cover, ensure that it’s firmly in place to protect users from direct contact with the springs.
Lastly, if your trampoline has a safety net, check for possible tears or weak spots and that the entrance is securely fastened to avoid accidental spills. Remember too that safe use is not just about equipment checks; establishing rules for use, such as one jumper at a time and no somersaults or risky maneuvers without proper instructional guidance, will significantly reduce the chance of injuries or accidents occurring on the trampoline.
Conclusion: Enjoy Your bellicon Rebounder Workout
Incorporating a bellicon Rebounder into your daily routine can be a joyful and revitalizing experience that combines fitness with fun. As you bounce away, you aren’t just engaging in an ordinary workout; you’re partaking in an activity that stimulates not just your muscles but your lymphatic system as well. This unique form of exercise ensures a full-body workout, promoting better balance, coordination, and agility. It’s easy to enjoy a bellicon workout because it feels less like a strenuous exercise regimen and more like a playful moment in your day.
The versatility of the bellicon Rebounder allows for a variety of workouts, making it enjoyable for people of all fitness levels. From gentle bouncing for beginners to high-intensity interval training for the more advanced, you can tailor your routine to meet your personal health and fitness goals. The bellicon Rebounder’s design ensures maximum safety and comfort, enabling you to focus on the pleasure of the workout. Remember, the key to a sustainable exercise habit is finding joy in the activities you choose—something the bellicon Rebounder offers in abundance.
Moreover, your bellicon Rebounder workout doesn’t have to be a solitary activity. It can be a fun way to engage with family or friends, encouraging each other and sharing the joy of movement. Integrating music or participating in rebounding classes can add an extra layer of excitement to your exercise routine. The social aspects combined with the inherent fun of bouncing can significantly enhance your overall enjoyment, helping you stay motivated and excited about your fitness journey.
🔥 Deals You Might Like!


William Liveman, also known as BounceBoss, is the visionary founder of Best Rebounder Trampoline. His personal journey through recovery using a rebounder has inspired the mission and vision of our blog. William is dedicated to sharing the benefits of rebounding and helping others find joy and health through this exercise. His leadership and passion drive the entire team to deliver the best content possible.


Where is the instructions?
Hi Susan,
Thank you for your comment. The assembly instructions for the Bellicon Rebounder are detailed in the article. Here is a summary of the steps:
For more specific details, please read each section of the article where these steps are explained in detail. If you need further assistance, feel free to ask.
Enjoy your bellicon workout!
When your “instructions” refer to the manual for details, you aren’t really giving instructions. If one has the manual, your “instructions” are redundant and incomplete.
Hi Greg,
Thank you for your comment and for taking the time to share your thoughts! You’re absolutely right, and I appreciate you pointing that out. My goal is to provide clear and helpful instructions for assembling the bellicon Rebounder.
I’ve found a very detailed video that shows step-by-step how to assemble the bellicon, and I believe it might be more helpful than just referring to the manual. You can watch it here: Bellicon Assembly Video
I’ll work on updating the article to include this video and provide more comprehensive instructions directly on the page, so they’re useful even for those who don’t have access to the manual.
Thanks again for your feedback! It helps me improve the content and offer a better experience to all readers.
Best regards.